MVC架构
分层概念
MVC模型
M:Model模型
V:View视图
C:Controller控制器
MVC是在表述层开发中运用的一种设计理念。主张把封装数据的『模型』、显示用户界面的『视图』、**协调调度的『控制器』**分开。
好处:
- 进一步实现各个组件之间的解耦
- 让各个组件可以单独维护
- 将视图分离出来以后,我们后端工程师和前端工程师的对接更方便
Service层
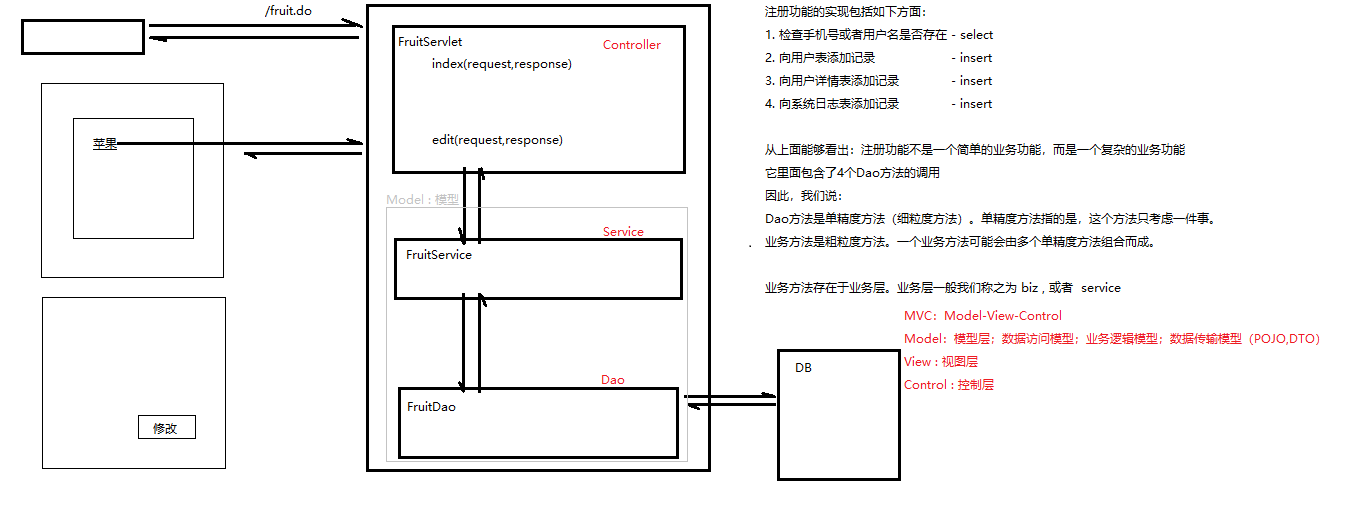
从上面能够看出:注册功能不是一个简单的业务功能,而是一个复杂的业务功能它里面包含了4个Dao方法的调用
因此,我们说:
Dao方法是单精度方法(细粒度方法)。单精度方法指的是,这个方法只考虑一件事。
业务方法是粗粒度方法。一个业务方法可能会由多个单精度方法组合而成。
业务方法存在于业务层。业务层一般我们称之为biz,或者 service层

// MVC: Model-Wiew-ControlModel:
模型层;数据访问模型;业务逻模型;数据传输模型(POJO,DTO)
View:视图层
Control:控制层
DTO层
DTO(Data Transfer Object,数据传输对象)
直译就是 数据传输对象,通常用于在 不同层 或 不同系统 之间传递数据。
在一个三层架构(Controller → Service → DAO/Entity)或前后端交互中:
Entity(实体类) 直接对应数据库表,往往带有很多不需要对外暴露的字段(如密码、状态、创建时间等)。
DTO(数据传输对象) 只保留和“数据传输”相关的字段,用于前后端交互,避免暴露过多内部细节。
VO(View Object) 一般用于返回给前端的对象(View 层),可能是 DTO 的扩展,包含展示需要的额外字段。
举个例子
用户注册时,前端提交的数据:用户名、邮箱、密码 → 后端用 UserDTO 接收。
数据库存储的 UserEntity 可能还包含 id、创建时间、加密后的密码、角色 等字段。
如果直接用 Entity 去做数据交互,容易暴露敏感字段。
所以,我们用 DTO 来“裁剪”和“隔离”。
DTO 的优点
解耦:DTO 和数据库实体解耦,修改数据库结构不会直接影响前端。

安全性:避免直接把数据库字段(比如密码)暴露给前端。

灵活性:可以根据业务需求定制,只包含必要的数据。

数据校验:DTO 上可以加注解(如 @NotNull @Email)做参数校验。
DTO 示例
实体类(Entity,对应数据库)
public class UserEntity {
    private Long id;
    private String username;
    private String password;   // 存储加密后的密码
    private String email;
    private Date createTime;
    private Date updateTime;

    // getter/setter
}
数据传输对象(DTO,用于前后端交互)
public class UserDTO {
    private String username;
    private String password;
    private String email;

    // getter/setter
}
控制器使用 DTO
@RestController
@RequestMapping("/user")
public class UserController {

    @PostMapping("/register")
    public String register(@RequestBody UserDTO userDTO) {
        // 接收前端传过来的 DTO
        System.out.println("注册用户:" + userDTO.getUsername());
        return "注册成功";
    }
}
这样,数据库中真正的 UserEntity 不会直接暴露给前端,安全性和灵活性更好。
DTO 不要和数据库实体类混用,否则就失去了隔离的意义。

建议使用 BeanUtils / MapStruct 来做 DTO ↔ Entity 的属性转换,避免手写冗余代码。

DTO 应该只包含 业务需要传输的字段,而不是照搬数据库表。
POJO层
翻译过来就是 简单的 Java 对象,指那些不依赖框架、只包含属性和 getter/setter 的普通类。
它本身是一个 概念,不局限于“实体类”,只要是“没有复杂逻辑的普通 Java 对象”都可以叫 POJO。
在一个分层项目里(比如 Spring Boot 项目),你会看到这些类,统称 POJO:
Entity(实体类):数据库表对应对象(存储数据用)
DTO(数据传输对象):前后端传输用
VO(视图对象):返回给前端展示用
BO(业务对象):业务逻辑层封装的对象
微服务架构
API 层
位置:最外层,直接暴露给前端或外部系统调用。

作用:
定义服务的输入和输出(通常是 DTO/VO)。
接收请求、做参数校验、调用内部服务。
对应技术:Controller 层 (Spring MVC 的 @RestController、@RequestMapping)。

简单说:API 层就是 对外提供接口的入口。
Gateway 层
位置:API 层的前面(或者外部流量的第一个入口)。

作用:
请求路由(转发到具体服务)。
统一认证、鉴权。
统一限流、日志、监控。

对应技术:Spring Cloud Gateway、Nginx、Kong、Zuul 等。
网关就是 大门口,所有流量先进来这,检查完才能进去。
Process 层
位置:API 层和 Service(领域/业务逻辑层)之间。

作用:
封装跨多个服务或多个业务对象的流程。
做“业务编排”,调用不同的 Service 完成一个完整业务。

对应技术:自己写的 Service/Manager 类,或者工作流引擎(如 Camunda、Activiti)。
Process 层更像是 管弦乐队的指挥,调度不同的业务模块协同完成任务。
CMC 层
你说的 cmc 更像是一个 特定业务域的核心服务层,通常存放和核心业务逻辑相关的类
解耦合
耦合的概念:

控制层需要业务层组件才能工作;
业务层需要数据访问层组件才能工作;
我们把这种需要称之为依赖;

依赖就是”"离不开”,依赖:dependency;
当前层和层之间存在依赖,我们将这种现象称之为层和层之间存在耦合;
解耦合:
因此我们需要降低耦合度或者消除耦合,称之为 解耦合/解耦
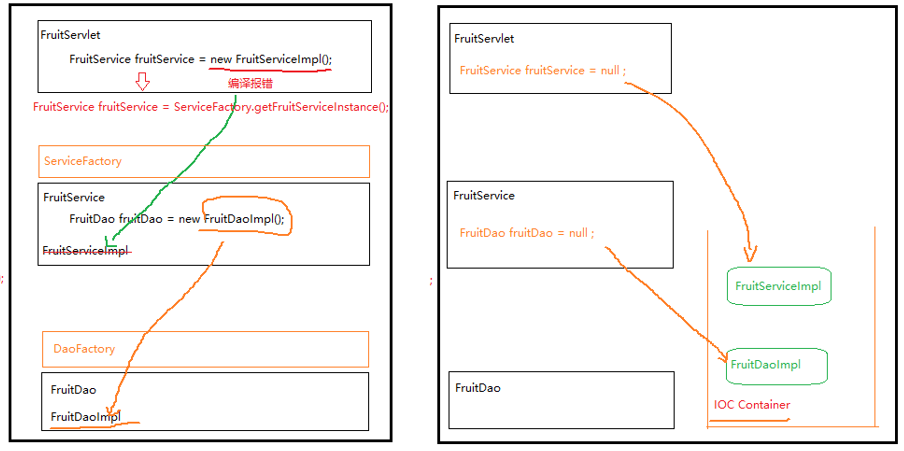
假设之前controller中有100个地方出现了new FruitServicelmpl:
那么我们就简单认为耦合度是100:1
如果我们使用简单工厂方法模式,调用工厂的静态方法获取实例那么耦合度降低成 1:1
耦合度大大降低,但不得不承认,问题依然存在:如果FruitServicelmpl修改成FruitServicelmpl2.
工厂中方法代码依然需要修改,那么需要重新编译,重新部署
配置 java.beans
JavaBean
JavaBean 是 Java 语言中一种符合特定规范的类,通常用来 封装数据。 它常用于表示一个实体(例如:用户、商品、订单),把属性和对应的 getter/setter 方法封装在一个类中。在我们的项目中JavaBean主要用于存储内存中的数据。
简单说:JavaBean = 一种标准的可重用组件。
JavaBean 规范
1、必须是一个 public 类。
2、必须有一个 无参构造方法(便于框架反射创建对象)。
3、属性通常用 private 修饰(实现封装)。
4、提供 public 的 getter/setter 方法 来访问属性。
5、通常是 可序列化的(可选,实现
Serializable接口),方便对象存储和传输。6、建议重写toString()方法,便于打印对象。
7、基本类型简写使用包装类型
8、不要写业务逻辑:JavaBean 应该专注于封装数据,而不是业务逻辑。
使用场景
1、数据封装:存储和传递数据(比如 MVC 模式里 Model 层)。
2、与数据库表对应:一个表对应一个 JavaBean,ORM(如 MyBatis、Hibernate)会自动映射。
3、Web 开发:Servlet/JSP、Spring、Spring Boot 中大量使用 JavaBean 来作为数据模型。
4、配置类:Spring 配置文件中的 Bean,大多数就是 JavaBean。
使用示例
JavaBean
import java.io.Serializable;

// 用户类
public class User implements Serializable {
    private int id;
    private String name;
    private String email;
    private boolean active;

    // 无参构造方法
    public User() {}

    // 全参构造方法(可选)
    public User(int id, String name, String email, boolean active) {
        this.id = id;
        this.name = name;
        this.email = email;
        this.active = active;
    }

    // Getter 和 Setter
    public int getId() {
        return id;
    }
    public void setId(int id) {
        this.id = id;
    }

    public String getName() {
        return name;
    }
    public void setName(String name) {
        this.name = name;
    }

    public String getEmail() {
        return email;
    }
    public void setEmail(String email) {
        this.email = email;
    }

    // 布尔类型建议用 isXxx
    public boolean isActive() {
        return active;
    }
    public void setActive(boolean active) {
        this.active = active;
    }

    @Override
    public String toString() {
        return "User {id=" + id + ", name='" + name + "', email='" + email + "', active=" + active + "}";
    }
}
使用 JavaBean
public class Main {
    public static void main(String[] args) {
        // 创建 JavaBean 对象
        User user = new User();

        // 使用 setter 设置属性
        user.setId(1);
        user.setName("Alice");
        user.setEmail("alice@example.com");
        user.setActive(true);

        // 使用 getter 获取属性
        System.out.println("用户ID: " + user.getId());
        System.out.println("用户名: " + user.getName());
        System.out.println("邮箱: " + user.getEmail());
        System.out.println("是否启用: " + user.isActive());

        // 打印完整信息
        System.out.println(user);
    }
}
封装BeanUtils
import java.lang.reflect.Field;

public class BeanUtils {

    /**
     * 将 source 对象的同名属性值拷贝到 target 对象中
     *
     * @param source 源对象
     * @param target 目标对象
     */
    public static void copyProperties(Object source, Object target) {
        if (source == null || target == null) {
            throw new IllegalArgumentException("Source 和 Target 不能为空!");
        }

        Class<?> sourceClass = source.getClass();
        Class<?> targetClass = target.getClass();

        // 获取源对象的所有字段
        Field[] sourceFields = sourceClass.getDeclaredFields();

        for (Field sourceField : sourceFields) {
            try {
                // 允许访问 private 属性
                sourceField.setAccessible(true);

                // 获取源对象的值
                Object value = sourceField.get(source);

                // 在目标对象中找同名字段
                Field targetField;
                try {
                    targetField = targetClass.getDeclaredField(sourceField.getName());
                } catch (NoSuchFieldException e) {
                    continue; // 如果目标对象没有该属性,跳过
                }

                // 如果类型相同,则赋值
                if (targetField.getType().isAssignableFrom(sourceField.getType())) {
                    targetField.setAccessible(true);
                    targetField.set(target, value);
                }
            } catch (IllegalAccessException e) {
                e.printStackTrace();
            }
        }
    }
}
使用示例
DTO
public class UserDTO {
    private int id;
    private String name;
    private String email;

    // getter/setter
}
实体类
public class User {
    private int id;
    private String name;
    private String email;
    private boolean active; // 目标类多一个属性

    // getter/setter + toString
}
测试类
public class Main {
    public static void main(String[] args) {
        UserDTO dto = new UserDTO();
        dto.setId(1001);
        dto.setName("Alice");
        dto.setEmail("alice@example.com");

        User user = new User();

        // 使用自定义 BeanUtils
        BeanUtils.copyProperties(dto, user);

        System.out.println(user);
    }
}
封装工厂类
为了解决耦合的问题:可以看出Service层需要Dao层实例对象操作,Servlet层需要Service层的实例操作,封装BeanFactory工厂类来创建实例,解耦合,让所有层与BeanFactory工厂类建立联系,从而降低耦合度。
IOC实现
Ioc类时于 类似 Spring 的 ApplicationContext,根据bean.xml 的配置。负责 创建对象实例(反射),负责 注入依赖(属性赋值)、类似一个工厂,负责生产实例。
IOC思想
IoC 的思想:对象不是自己创建的,而是“被动地被容器注入”。
传统写法:
FruitDao fruitDao = new FruitDaoImpl();
👉 程序员自己 new 对象。
IoC 写法:
private FruitDao fruitDao;
👉 不再手动 new,容器(如 BeanFactory)帮你创建并注入。
BeanFactory 的作用
假设你有一个类似这样的简单 IoC 容器(示例伪代码):
public class BeanFactory {
    private static Map<String, Object> beanMap = new HashMap<>();

    static {
        beanMap.put("fruitDao", new FruitDaoImpl());
        beanMap.put("fruitService", new FruitServiceImpl());
    }

    public static Object getBean(String name) {
        return beanMap.get(name);
    }
}
这个工厂一启动就创建好所有 Bean,并保存到 beanMap 里。
而 FruitServiceImpl 中的 fruitDao 成员,通常是在 实例化后由 IoC 自动设置的。
自动注入过程(可能由反射完成)
FruitServiceImpl fruitService = (FruitServiceImpl) BeanFactory.getBean("fruitService");

// IoC 容器启动后会反射性地为 fruitService 注入 fruitDao
Field daoField = FruitServiceImpl.class.getDeclaredField("fruitDao");
daoField.setAccessible(true);
daoField.set(fruitService, BeanFactory.getBean("fruitDao"));
这段逻辑通常在框架的“初始化容器”代码中执行,所以你不会直接在业务类中看到赋值操作。但实际上它确实发生过。
封装BeanFactory工厂类
配置xml文件
<?xml version="1.0" encoding="utf-8" ?>
<!DOCTYPE beans [
<!--定义元素根节点 * 一个或多个 -->
<!ELEMENT beans (bean*)>
<!--定义元素bean子节点 * 一个或多个 -->
<!ELEMENT bean (property*)>
<!--定义元素property节点 类型为字符串 -->
<!ELEMENT property (#PCDATA)>
<!--定义节点上的属性-->
<!ATTLIST bean id ID #REQUIRED>
<!ATTLIST bean class CDATA #REQUIRED>
<!ATTLIST property name CDATA #REQUIRED>
<!ATTLIST property ref IDREF #REQUIRED>
]>
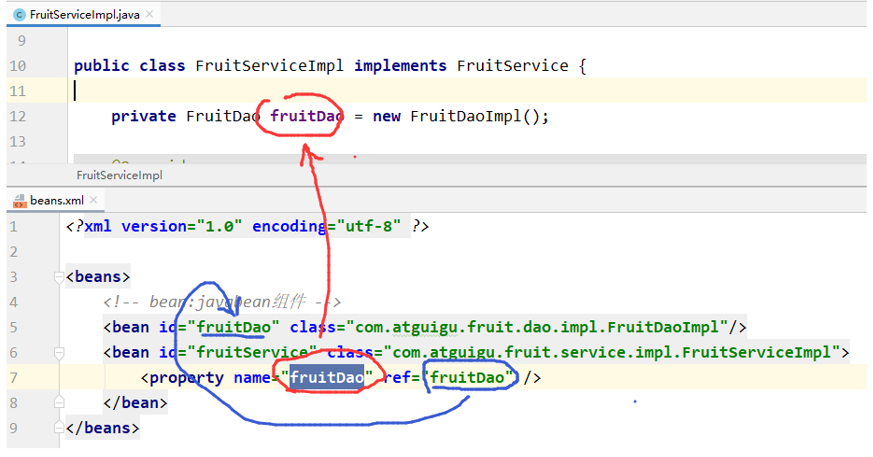
<beans>
<!--bean:使用javaBean组件 定义每个接口的实现类位置 -->
<bean id="fruitDao" class="com.fruit.yuluo.dao.impl.FruitDaoImpl"></bean>
<bean id="fruitService" class="com.fruit.yuluo.service.impl.FruitServiceImpl" >
<!-- 声明FruitServiceImpl实现类中属性名 -->
<!-- FruitDao fruitDao = new FruitDaoImpl(); -->
<!-- ref 指向FruitDaoImpl实现类的bean标签的id -->
<property name="fruitDao" ref="fruitDao"></property>
</bean>
</beans>
创建BeanFactory接口
package com.fruit.yuluo.ioc;

// Bean工厂,给一个id返回一个JavaBean实例
public interface BeanFactory {
    Object getBean(String id);
}
创建BeanFactory实现类,ClassPathXmlApplicationContext类
package com.fruit.yuluo.ioc.impl;

import com.fruit.yuluo.ioc.BeanFactory;
import com.fruit.yuluo.utils.ClassUtil;
import com.sun.org.apache.xerces.internal.jaxp.DocumentBuilderFactoryImpl;
import org.w3c.dom.Document;
import org.w3c.dom.Element;
import org.w3c.dom.Node;
import org.w3c.dom.NodeList;

import javax.xml.parsers.DocumentBuilder;
import javax.xml.parsers.DocumentBuilderFactory;
import javax.xml.parsers.ParserConfigurationException;
import java.io.InputStream;
import java.util.HashMap;
import java.util.Map;

public class ClassPathXmlApplicationContext implements BeanFactory {

    // 创建一个Map集合,键值对集合,每一个键值,键为String类型的接口类型,值为接口的实现类实例。
    // 这些实例中根据xml的配置,有的有属性且指向另一个实例对象,有的没有属性
    // {{"fruitDao":@xxcc},{"fruiService":@xxzz}}
    /*
    * @xxcc: new FruitDaoImpl 实例
    * @xxzz: new FruitServiceImpl 实例,且包含 @xxzz.fruitDao = @xxcc 属性
    * */
    private Map<String,Object> beanMap = new HashMap<>();

    @Override
    public Object getBean(String id) {
        // 获取map集合中的键的值
        return beanMap.get(id);
    }

    // 在构造方法中解析xml文件配置
    public ClassPathXmlApplicationContext() {
        try {
            // 加载xml
            InputStream in = this.getClass().getClassLoader().getResourceAsStream("bean.xml");
            DocumentBuilderFactory factory = DocumentBuilderFactory.newInstance();
            DocumentBuilder builder = factory.newDocumentBuilder();
            // 获取doc对象
            Document doc = builder.parse(in);
            // 解析doc对象,每个Node标签节点称为一个bean
            NodeList beanNodeList = doc.getElementsByTagName("bean");
            // 获取bean节点
            for (int i = 0; i < beanNodeList.getLength(); i++) {
                // 获取bean节点
                Node beanNode = beanNodeList.item(i);
                // 判断如果是元素节点
                if (beanNode.getNodeType() == Node.ELEMENT_NODE){
                    // 强制转为元素节点
                    Element beanElement = (Element) beanNode;
                    // 获取bean元素上属性
                    String id = beanElement.getAttribute("id"); // fruitDao
                    String className = beanElement.getAttribute("class"); // com.yuluo.dao.impl.FruitDaoImpl
                    // 通过反射获取实现类的实例,bean,种子
                    Object beanInstance = ClassUtil.createInstance(className); // new FruitDaoImpl @xxcc
                    // 把这个实例对象存放在map集合中
                    beanMap.put(id,beanInstance); // {{"fruitDao": @xxcc},{"fruiService":@xxzz}}
                    /*
                    *  {{"fruitDao":@xxcc},{"fruiService":@xxzz}}
                    *
                    * */

                }
            }
            // 手写 IoC 容器中的“自动注入依赖”核心逻辑
            // 重新遍历 beanNodeList 节点
            for (int i = 0; i < beanNodeList.getLength(); i++) {
                Node beanNode = beanNodeList.item(i);
                if (beanNode.getNodeType() == Node.ELEMENT_NODE){
                    Element beanElement = (Element) beanNode;
                    // 获取beanEle标签上的id的值
                    String id = beanElement.getAttribute("id"); // fruitService
                    // 从Map集合中取出 bean实例
                    Object bean = beanMap.get(id); // @xxzz

                    // 解析Xml中的子标签中的属性
                    NodeList beanChildNodeList = beanElement.getChildNodes();
                    for (int j = 0; j < beanChildNodeList.getLength(); j++) {
                        Node beanChildNode = beanChildNodeList.item(j);
                        // 判断子节点的元素的标签名称是否是property元素节点
                        // 没有则直接跳过,表示当前类中没有属性需要工厂类的需求
                        if (beanChildNode.getNodeType() == Node.ELEMENT_NODE && "property".equalsIgnoreCase(beanChildNode.getNodeName())){
                            // 强转为Element元素
                            Element propertyElement = (Element) beanChildNode;
                            // 获取属性名和属性值
                            String propertyName = propertyElement.getAttribute("name"); // fruitDao
                            // 这里的Ref指向id,也就是属性名
                            String propertyRef = propertyElement.getAttribute("ref"); // fruitDao
                            // 将propertyRef对应的实例取出来
                            Object refObj = beanMap.get(propertyRef); // 这里取出来的是 @xxcc 实例
                            // 将refObj赋值给bean的 propertyName 属性
                            // 给fruitService实例(@xxzz)中添加了 fruitDao 属性,并指定属性的指向为 FruitDao的实例(@xxcc)
                            ClassUtil.setProperty(bean,propertyName,refObj);
                            // 相当于在FruitService类中执行了 FruitDao fruitDao = new FruitDaoImpl()
                        }
                    }
                }
            }
        } catch (Exception e) {
            e.printStackTrace();
        }
    }
}
beanMap 就是一个 简单的单例池。
- 第一次循环:实例化所有 bean。
- 第二次循环:根据
<property>做依赖注入。
最终效果:
FruitServiceImpl fruitService = new FruitServiceImpl();
fruitService.setFruitDao(new FruitDaoImpl());
DocumentBuilderFactory.newInstance()就够了,内部会自己找实现类。
getParameters()编译问题
JDK中的反射,getParameters()方法,默认获取到的形参名称是 arg0,arg1...,从JDK1.8之后可以获取到形参名称,在IDEA中的设置中添加 -parameters,即可。
file-setting-builder-compiler-java compiler-additional command line 设置 -parameters
同时在 Other Setting - setting for new Project中设置一遍,目的是为了在其他的项目中也生效。
1. 业务层引入
注册功能包含了很多的DAO操作。如果没有业务层,那么这些业务逻辑全部散在控制层,也就是散在servlet中。
其实最好的解决方案是:提供业务层组件,将复杂的业务逻辑(多个DAO方法的调用)全部封装在一个业务方法中,然后控制层(Servlet)只需要调用这个业务方法即可,不用拘泥于注册的业务逻辑细节。
2. 耦合、依赖
控制层依赖于业务层;业务层依赖于数据访问层
我们追求的目标是:解耦(降低耦合,理想状况是0耦合)
解决方案:BeanFactory
public interface BeanFactory{
Object getBean(String id);
}
在BeanFactory的眼中,不论是业务层还是控制层还是数据访问层组件,都是一个一个的javabean
只不过这些javabean之间存在依赖关系
public class FruitServiceImpl {
private FruitDao fruitDao = new FruitDaoImpl();
}
->
private FruitDao fruitDao = null ;
变成上述形式之后运行,肯定报空指针。
也就意味着,在使用fruitDao之前,必须得给它赋值
<bean id="fruitDao" class="com.atguigu.dao.impl.FruitDaoImpl"/>
<bean id="fruitService" class="com.atguigu.service.impl.FruitServiceImpl">
<property name="fruitDao" ref="fruitDao"/>
</bean>
上面仅仅是一种描述,描述了两个信息:
① 我们需要生产两个bean实例:fruitDao,fruitService
② 这两个bean实例是有关系的,是�有依赖关系的,我们需要注入依赖关系
因此,我们又编写了BeanFactory这个接口的实现类:ClassPathXmlApplicationContext
这个实现类的核心方法中有两个重要的for循环:
第一个循环解决了两个bean组件的创建工作
第二个循环解决了两个bean组件之间的依赖关系
3. IOC/DI
IOC : 控制反转 , I:反转inverse , C:控制,controller
之前,FruitServiceImpl:
public class FruitServiceImpl {
private FruitDao fruitDao = new FruitDaoImpl();
}
也就意味着,fruitDao这个实例对象的生命周期是由fruitService组件控制的。设置成成员变量或者方法内部的临时变量,那么它的生命周期是不一样的。另外,何时销毁也是由程序员去考虑的。另外,dao这个实例到底是不是单例,到底是不是(懒汉模式....)都是需要程序员去考虑的
所以此时BeanFactory出现了。这个组件在程序启动时,就准备好了所有的bean实例组件,然后组装他们之间的依赖关系。也就意味着,这些组件的生�命周期(控制权)从程序员的手中反转给BeanFactory去管理。
DI:Dependency Injection 。Dependency:依赖 , Injection:注入
IOC侧重于阐述对象的生命周期控制权。DI侧重于阐述依赖关系的注入(维护)
API
OGNL
OGNL 工具类:OgnlUtils 是基于 OGNL (Object Graph Navigation Language) 封装的工具,统一管理 Web 请求的;
param → 请求参数(表单、URL 参数)
request → request 域属性
session → session 域属性
Controller 中只需通过 OGNL 表达式 操作数据,而无需直接依赖 HttpServletRequest 或 HttpSession
工具类核心方法:
public class OgnlUtils {
    // 初始化时传入 WebContext
    public OgnlUtils(WebContext webContext);

    // 读取值
    public Object getValue(String expr) throws Exception;

    // 写入值
    public void setValue(String expr, Object value) throws Exception;
}
支持的表达式规则
| 作用域 | 访问方式 | 示例 | 说明 |
|---|---|---|---|
| 参数 | #param.xxx | #param.fname | 获取请求参数 fname |
| request | #request.xxx | #request.fruitList | 获取 request 域中 fruitList |
| session | #session.xxx | #session.keyword | 获取 session 域中 keyword |
使用示例
// 获取请求参数
String fname = (String) ognl.getValue("#param.fname");
String price = (String) ognl.getValue("#param.price");
// 获取 request 域数据
List<Fruit> fruits = (List<Fruit>) ognl.getValue("#request.fruitList");
// 获取 session 域数据
String keyword = (String) ognl.getValue("#session.keyword");

// 设置 request 域数据
ognl.setValue("#request.pageNo", 1);
ognl.setValue("#request.pageSize", 10);
// 设置 session 域数据
ognl.setValue("#session.keyword", "苹果");
Controller 方法调用示例
public String list(OgnlUtils ognl) throws Exception {
    // 取参数
    String keyword = (String) ognl.getValue("#param.keyword");
    Integer pageNo = (Integer) ognl.getValue("#param.pageNo");

    if (keyword == null) keyword = "";
    if (pageNo == null) pageNo = 1;

    // 调用 service
    List<Fruit> fruitList = fruitService.getFruitList(keyword, pageNo, 5);

    // 设置作用域
    ognl.setValue("#request.fruitList", fruitList);
    ognl.setValue("#request.pageNo", pageNo);

    return "list";
}
这样的好处是:Controller 可以单元测试,不依赖 Servlet 容器;
统一使用 OGNL 表达式管理数据,写法简洁、统一;
thymeleaf关系
Apache OGNL

独立的表达式语言库,全称 Object Graph Navigation Language;
需要引入 ognl-x.x.x.jar 使用;
可以用 Ognl.getValue("xxx", context, root) 解析和执行表达式;
Struts2、Spring WebFlow 等框架早期广泛用它;


Thymeleaf 表达式 (有时也被叫作 OGNL)

Thymeleaf 在 2.x 版本里,默认使用 OGNL 作为表达式解析器;
表达式写法类似 th:text="${user.name}";
实际上底层就是在调用 OGNL 库去解析 ${...} 里的内容;
从 Thymeleaf 3.x 开始,已经换成了 Spring EL (SpEL) 作为默认表达式语言;
但语法风格和 OGNL 很像,所以很多教程和资料还在说 “Thymeleaf 的 OGNL 表达式”;
举例对比
// Apache OGNL 独立用法:
import ognl.Ognl;
import ognl.OgnlContext;

Map<String, Object> root = new HashMap<>();
root.put("user", new User("Liu", 28));

OgnlContext context = new OgnlContext();
context.setRoot(root);

String expr = "user.name";
Object value = Ognl.getValue(expr, context, root);
System.out.println(value);  // Liu
<!--Thymeleaf 模板里-->
<p th:text="${user.name}"></p>
<!-- 底层 2.x 是用 OGNL 解析 user.name,3.x 是用 SpEL -->

<!--
Thymeleaf 2.x 的 ${} 表达式 → 底层确实是 Apache OGNL
Thymeleaf 3.x 之后 → 换成了 Spring EL (SpEL)
-->